

| Version 9 (modified by , 7 years ago) ( diff ) |
|---|
Перевод не завершён
Другие языки:
- English
- español
- français
- 日本語
- Nederlands
- русский
- українська
- @80 - @103
Содержание
Если вам нужен полный список отношений в данных, загруженных в JOSM, смотрите Диалоговая панель «Отношения»
Отношения можно также редактировать с помощью щелчка правой кнопкой мыши в диалоговой панели «Теги/Участие»
Некоторые модули позволяют упростить редактирование отношений, а именно turnrestrictions или turnlanes
Окно редактора отношений
Окно редактора отношений — это один из многих способов создания, редактирования и удаления отношений. Это самый мощный инструмент в ядре JOSM.
Способы активации
- В редакторе отношений:
- кнопка «Создать копию отношения» открывает созданное отношение в редакторе отношений
- кнопки в секции «Участники» могут открыть один или несколько редакторов отношений
- выполните двойной щелчок на полном отношении в таблице участников, чтобы открыть редактор отношений
- выделите отношение(я), затем нажмите кнопку «Правка» во вкладке «Родительские отношения», чтобы открыть один или несколько редакторов отношений
- выполните двойной щелчок на элементе вкладки «Родительские отношения», чтобы открыть редактор отношений
- В диалоговой панели «Теги/Участие»:
- если имеется таблица "Участник", то можно:
- использоватьщелчок правой кнопкой и выбрать «Правка» для открытия редактора отношений
- выполнить двойной щелчок на элементе, чтобы открыть редактор отношений
- если имеется таблица "Участник", то можно:
- В Диалоговой панели «Отношения»:
- используйте кнопку «Создать новое отношение» для создания нового отношения и открытия его в редакторе отношений
- выделите отношение (в диалоговой панели «Отношения»), нажмите вторую слева кнопку, чтобы открыть один или несколько редакторов отношений
- кнопка «Создать копию этого отношения» откроет копию в редакторе отношений
- В диалоговой панели «Выделение»:
- выделите отношение(я) (в диалоговой панели «Выделение»), используйте команду контекстного меню «Правка» для открытия редактора отношений
- выполните двойной щелчок на отношении, чтобы открыть редактор отношений
Редактор отношений
Кнопки наверху
 | Обновить отношение из слоя данных (подробности см. ниже) |
 | Применить текущие изменения, сделанные в редакторе отношений, к данным. TODO: пояснить, когда использовать эту кнопку |
 | Выделить текущее отношение, редактируемое в окне редактора отношений |
 | Создать копию отношения и открыть её в другом окне редактора отношений |
 | Удалить текущее редактируемое отношение |
Вкладка «Теги и участники»
Верхняя часть вкладки похожа на диалоговую панель «Теги/Участники», где можно ввести теги для отношения, а нижняя часть содержит список участников отношения слева и список текущих выделенных элементов справа.

Верхняя половина: теги самого отношения
Наверху расположены ссылки на заготовки, соответствующие текущим тегам отношения, а ниже теги в таблице.
Заготовки, соответствующие отношению, можно открыть здесь (они более информативны, чем панель тегов). Щёлкните на ссылке, чтобы открыть полный вид заготовки, как обычно.
Три кнопки слева:
 | Добавить новый тег |
| | Удалить отмеченное в таблице тегов |
 | Вставить теги из буфера |
Примечание: проще изменять теги в диалоговой панели «Теги/Участие».
Нижняя половина, левая сторона: участники отношения
Слева в нижней половине окна расположена таблица участников отношения.
Таблица
В таблице показаны для каждого участника отношения:
- слева — его роль в отношении
- в середине — тип объекта в виде значка и некоего идентификатора (имя, ref или просто ID объекта)
- двойной щелчок на строке с полным отношением откроет окно редактора отношений для данного отношения
- справа — информация о соединениях линии с соседними участниками, полезная для проверки непротиворечивости, например, проверки того, что участники мультиполигона формируют замкнутый контур, или что маршрут является непрерывной линией без каких-либо разрывов в середине.
Контекстное меню в таблице
Разрыв обозначается красной точкой.
- Приблизить - масштабирует до самого верхнего элемента из текущих выделенных участников
- Масштабировать к разрыву (активна, только если выделен разрыв) - масштабирует до разрыва
- Выбрать предыдущий разрыв
- Выбрать следующий разрыв
Текущие выделенные участники
Selecting members in the #Table works as usual: hold Ctrl to select multiple items. Left click on the item to add/remove it from the selection.
On the right you can see example that only "K 8830" way was selected.
Buttons
The buttons on the left offer the following actions if appropriate:
 | Move the currently selected members up (Alt+up)
|
 | Move the currently selected members down (Alt+down)
|
 | Open additional relation editors for the currently selected members of object type relation |
| | Remove the currently selected members from the relation (Alt+Delete)
|
 | Sort the currently selected members (Alt+End)
|
 | Sort the currently selected members and all members below (expert mode only) |
 | Reverse the order of the currently selected members |
 | Download all incomplete members (Alt+Home)
|
 | Download selected incomplete members |
Text field below the table used to set role to #Currentlyselectedmembers
Bottom half, right side, selection
In the lower right part is the selection list where currently selected objects in the current data set are shown. The list is basically a mirror of the Selection window. Objects with yellow background color are already member of the relation.
The buttons offer following actions:
 | Add all objects selected in the current data set before the first member |
 | Add all objects selected in the current data set before the first selected member |
 | Add all objects selected in the current data set after the last member selected member |
 | Add all objects selected in the current data set after the last member |
 | Select relation members in the member list which refer to objects in the current selection |
 | Select objects in the current data set for currently selected relation members in the member list |
 | Remove all members referring to one of the selected objects in the current data set |
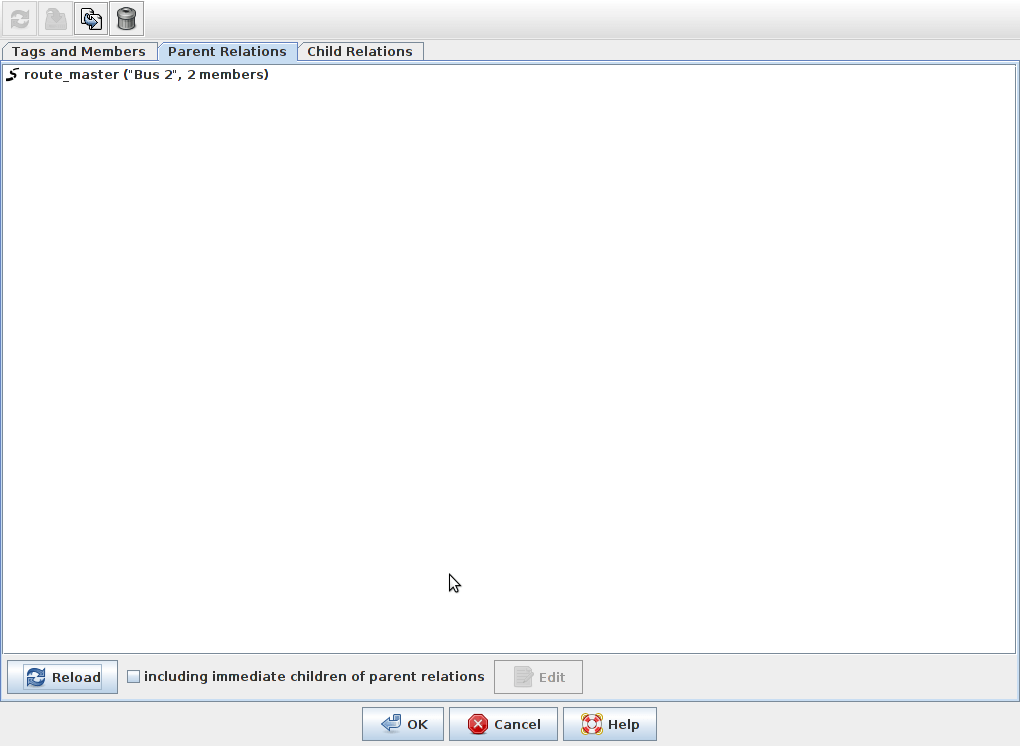
Parent Relations tab
Reload button - will fetch all parent relation from API (parent relations list will be empty if there no parent relations).
Double click at any parent relation will open Relation editor with respective relation.
Note: only one parent relation is shown for relation 51560:
Child Relations tab
TODO: any details?

Drag and Drop support
The relation editor has an advanced drag and drop support. You can do the following actions:
- reorder the members in the members list
- move an object from the Selection window to the members list in the relation editor (with automatic role suggestion)
- move an object from the members list of one relation editor instance to another relation editor instance
- move an object from the members list of one relation editor instance to another relation editor instance from another layer*
- move an object from the members list of one relation editor instance to another relation editor instance from another JOSM instance*
- move an object from the members list of the relation editor or from the Selection window to an external text editor
* provided the objects are part of the dataset
Error and Warning Messages
Conflict in data when saving or applying a relation
A relation may be edited concurrently in the relation editor window and outside of the relation editor window. While the relation editor window for a relation is open you may for instance split a way the relation refers to. In this case, the relation is modified but the changes due to the way splitting are not immediately reflected in the relation editor window. You need to click on the refresh button to update the data in the relation editor. Anyhow JOSM keeps track of them and when you close the relation editor window or apply changes, without pressing the refresh button before, the following warning message is displayed:

It indicates that JOSM is aware of two incompatible versions of this relation. Since JOSM can't resolve the differences between these versions automatically, it proposes to create a conflict which you can resolve later using the Conflict Dialog.
A similar warning is the following:

It appears when you made changes in the relation and in the data layer and then click on the refresh button.
So the workflow should always be like this (if you want to do changes in the relation editor and the data layer at the same time, i.e. while the relation editor stays open):
- After doing changes in the relation editor and before doing changes in the data layer press the
 apply button.
- After doing changes in the data layer and before doing changes in the relation editor press the
 refresh button.
Otherwise you will see the above warnings and end in a conflict.
Unsaved changes
The following warning appears when you make changes in the relation editor and do not press the Apply or OK button, but the Cancel button, the cross or Escape to close the window.

See also
 Relations window - all loaded relations are listed here
- Object - detailed explanation what relation is
- Help/Relations - steps how to create parent relations, edit parent/child relations and so on
- Concepts/Conflict
Back to Main Help