

| Version 23 (modified by , 14 years ago) ( diff ) |
|---|
Languages:
- English
- español
- français
- 日本語
- Nederlands
- русский
- українська
Connection settings
The URL to the OSM server
Downloading and uploading to the default server

Most JOSM users want to exchange geo data with the standard OSM server operated by the OSM community.
Tick the respective checkbox in order to download from and upload to the standard server (see screenshot above). This is the default setting.
Advanced option: Downloading and uploading to a custom server
Some JOSM users need to configure the API URL of an OSM server because they are working with a custom server:
- Some users are working with local installations of the OSM server
- Some users are working with development and test instances of the OSM server (for instance with http://api06.dev.openstreetmap.org).

In order to use a custom URL:
- Remove the tick in the checkbox for the standard API URL (see screenshot above)
- Enter the API URL
Click on Validate to test whether an OSM API server is available at the given URL. If so, JOSM will display the icon  to the right of the input field for the API URL. If the URL isn't valid, JOSM will display the icon
  .
.
Authentication Settings
Working anonymously or with an OSM account
You don't need to identify and authenticate yourself provided that you neither upload data to the OSM server nor download data for which you must authenticate first.
If you work anonymously you are allowed
- to download geo-data from the OSM server and save it to a local file
- to download public GPS traces from the OSM server
- to load geo data from a file, edit it, and save it back to a file
However, you can't
- upload geo-data to the OSM server. You can't created, update, or close changesets either.
- download your private GPS traces
You are recommended to create an OSM user account. By using this form you can choose an OSM username and an OSM password both of which you will use below.
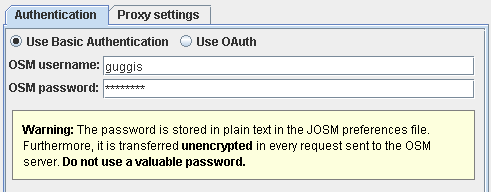
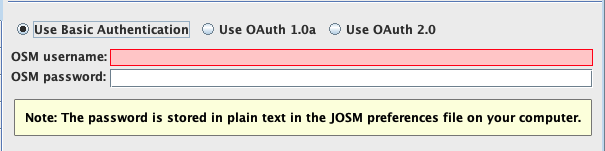
Basic authentication
Basic authentication is the basic mechanism to authenticate yourself at the OSM server.
Here's a screenshot of the preferences panel for basic authentication:

To use Basic Authentication
- Go to the tab Authentication in the Connection Preferences
- Select the authentication method Basic authentication
- Enter your OSM username and your OSM password
Warning!
The password is stored in plain text in the JOSM preferences file.
Furthermore, it is transferred unencrypted in every request sent to the OSM server.
Do not use a valuable password.
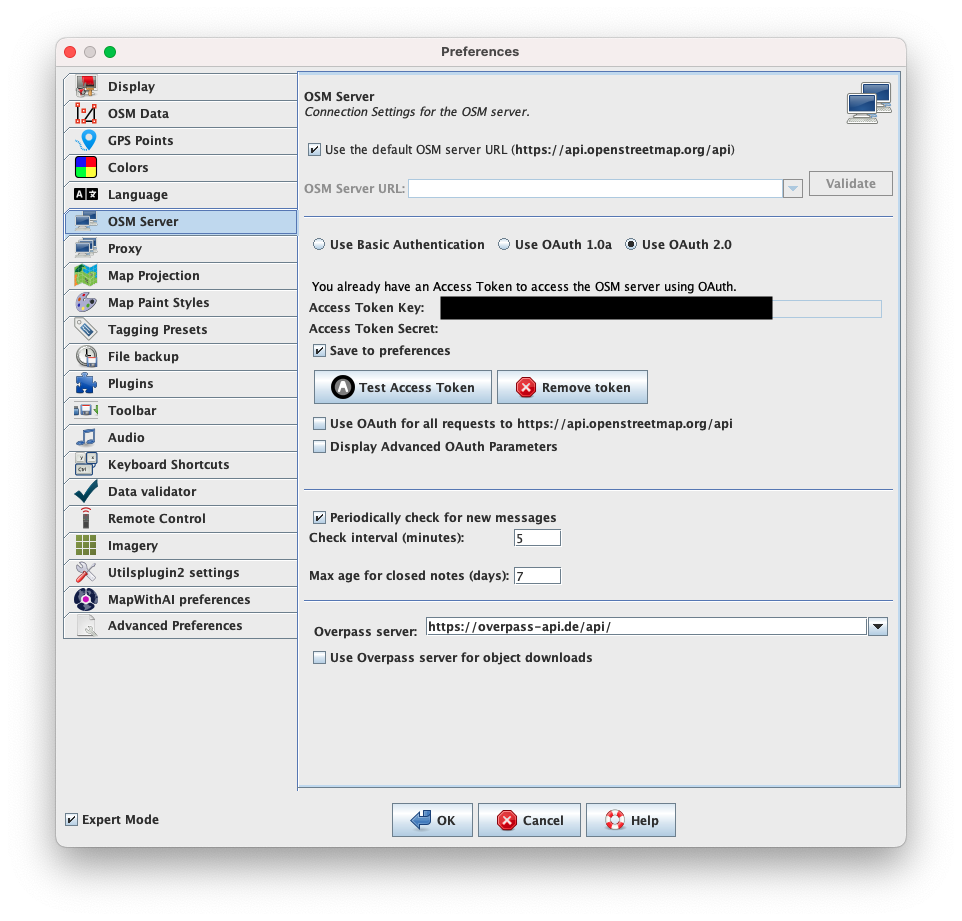
OAuth based authentication
OAuth is an open protocol to allow secure API authorization in a simple and standard method from desktop and web applications. The OSM server supports OAuth in addition to basic authentication.
OAuth has two major advantages over basic authentication:
- Your OSM password doesn't have to be saved in clear text in the JOSM preferences file.
- Your OSM password has to be transferred only once over the Internet, in contrast to basic authentication where your OSM password is transferred as part of every request sent from JOSM to the OSM server.
Warning!
Currently, the OSM server doesn't offer a secure communication channel. Even if you use OAuth your password is therefore transferred once in clear text over the Internet. Do not use a valuable password until the OSM server provides a secure communication channel (HTTPS).
For advanced users, OAuth has additional advantages:
- With OAuth you can generate restricted Access Tokens which you given somebody else such that another mapper can act on your behalf. For instance, a mapper could generate an Access Token which grants somebody else the right to download its private GPS traces. Even if he gives this Access Token to somebody else, his OSM password is kept private. In addition, he can revoke the special Access Token at any time. JOSM supports this kind of advanced configuration in the OAuth Authorisation Wizard with the authorisation procedure Manual authorization.
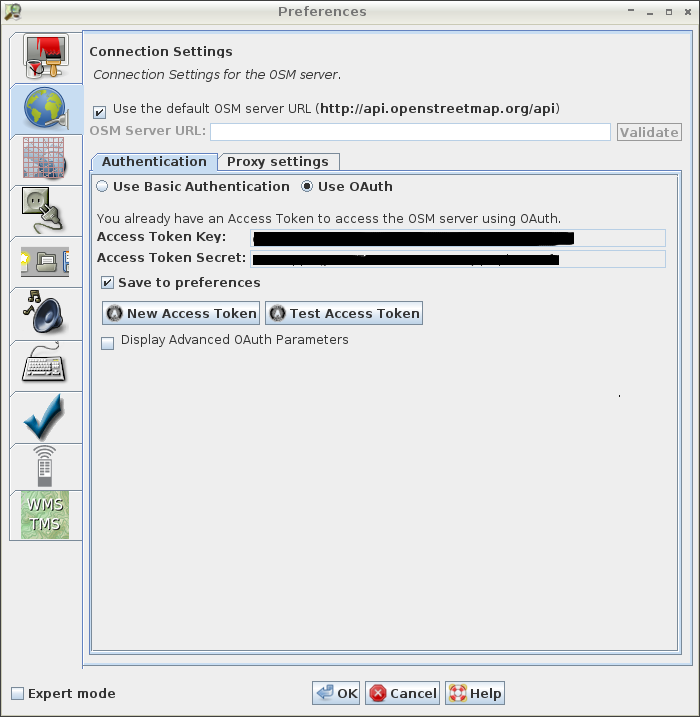
To use OAuth based Authentication
- In the Connection Preferences go to the tab Authentication
- Select the authentication method OAuth based authentication
- Click on Authorise now to launch the OAuth Authorisation Wizard (see screenshot below)

This will launch the OAuth Authorisation Wizard. Use one of the available authorization procedures in this dialog to get a valid Access Token.
JOSM displays the retrieved Access Token in the preferences panel (see screenshot below):
Deselect the checkbox Save to preferences if you don't want to save the Access Token in the JOSM preferences. If you don't save it the Access Token will be lost when you close JOSM. If you later startup JOSM again you will have to retrieve a new Access Token to work with OAuth based authentication again.
Click on Test Access Token to submit a test request with the token to the OSM server. JOSM will analyse whether this token is authorized to access the OSM server.
Click on New Access Token to generate a new Access Token.
Advanced OAuth parameters
Select the checkbox Display Advanced OAuth parameters to display the important OAuth parameters
- the Consumer Key and the Consumer Secret identifying JOSM as OAuth consumer
- the Request Token URL where JOSM can retrieve Request Tokens
- the Access Token URL where JOSM can retrieve Access Tokens
- the Authorise URL where JOSM users are redirected to to authorise a Request Token
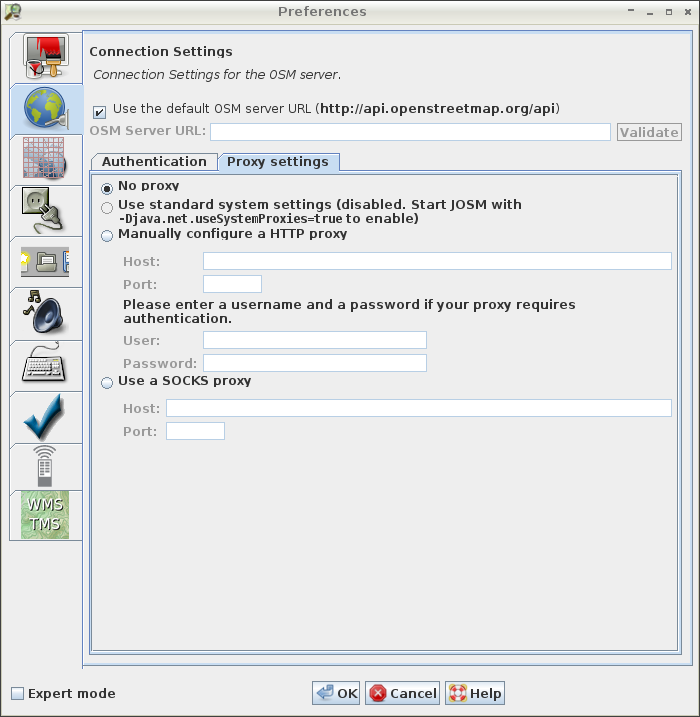
Proxy Settings
JOSM communicates with the OSM server using the Hypertext Transfer Protocol (HTTP). If required it can relay its requests through a HTTP proxy or a SOCKS proxy.
- Go to the tab Proxy settings in the Connection Preferences
- Select one of the available options and enter additional configuration parameters
- Save the preferences

Using the standard system proxy
If you always want to use the proxy defined as standard proxy on your computer you have to start up JOSM with a special command. The command line has to include the parameter -Djava.net.useSystemProxies=true, for instance
java -Djava.net.useSystemProxies=true -jar josm.jar
File Backup
If you save geo data to a local file and the file already exists JOSM writes the data to a temporary file (with the suffix ~). It then copies the temporary file to the target file.
In the File Backup settings you can specify whether JOSM should delete the temporary file or whether it should leave it as "backup" in the file system.
- Go to the tab File backup in the Connection Preferences
- Select or deselect the checkbox Keep backup files
Back to Main Help
Attachments (9)
- basic-authentication.png (7.5 KB ) - added by 15 years ago.
- use-default-api-url.png (3.1 KB ) - added by 14 years ago.
- use-custom-api-url.png (3.5 KB ) - added by 14 years ago.
-
proxy-settings.png
(68.9 KB
) - added by 12 years ago.
new proxy-settings
-
oauth-authentication.png
(69.2 KB
) - added by 12 years ago.
oauth screenshot
-
PreferencesOsmServer.png
(138.1 KB
) - added by 3 years ago.
new screenshot
-
PreferencesOsmServerExpert.png
(149.0 KB
) - added by 3 years ago.
new expert mode screenshot
- basic-authentication.2.png (14.6 KB ) - added by 9 months ago.
-
oauth-2-authentication.png
(217.3 KB
) - added by 9 months ago.
OAuth 2.0 authentication (logged in)
Download all attachments as: .zip